Flashing Evercoss Winner Tab V (AT8B)... and Possibly Other Spreadtrum Devices
 |
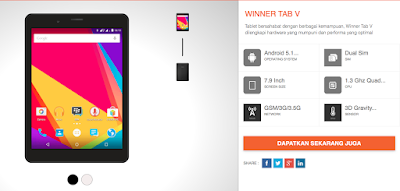
| Evercoss Winner Tab V specs at a glance. |
Last year, for business purposes, my workplace decided to purchase Evercoss Winner Tab V, a very delicate entry-level Android tablet. The tablet currently serves as a template and benchmark device for our web apps. Even though the specs are... well, let's say they reflect its highly-affordable price... the tablet itself is pretty good. In fact, to our surprise, we just realized that it's been upgraded to Marshmallow. Yes, the Winner Tab V, which comes with Lollipop (Android 5.1) and costs less than $100 has received the major update to Marshmallow. Don't hold your breath for Nougat, though...
However, the update process isn't as easy as OTA. You need to flash the firmware. Yes, you read that right--flash the firmware, which may include risks such as brick and bootloop. The instructional video listed on the device's support page wasn't helpful, either, as it seems to be outdated (the PC in the video still runs Windows XP) and some elements are different (such as booting button and removable battery). Well, okay... I guess that affordable price doesn't include decent support and update process.
So, yeah, that's why you're reading this article today. In case you have this device (or other Spreadtrum-powered devices) and want to either re-flash or update, you can follow this instruction. Of course, this article comes with the usual disclaimer: This article is for instructional purposes only. The writer is not responsible for any damages caused to your device. The writer writes this article after successfully implementing the said instructions.
Alright, let's head past the break and find out how you can flash (or update) this device.
Flashing Your Evercoss Winner Tab V
Disable Driver Signature Enforcement in Windows 8 and 10 64-bit
If you're using 64-bit Windows 8 and 10, you need to disable Driver Signature Enforcement. TL;DR, Driver Signature Enforcement means that your Windows will only allow installation of drivers which are signed by Microsoft, thus should making your system more secure. Unfortunately, the drivers included in this instruction aren't signed, so you will always receive an error when trying to install them. Don't worry, the drivers are still safe.
Here's how you can turn off the Driver Signature Enforcement. The following instruction is for Windows 10. The steps should be similar to Windows 8:
- Go to Settings -> Recovery -> Advanced Startup (or just search "Advanced Startup" from the Start Menu or Settings). Click "Restart Now".
- From the blue screen, select Troubleshoot -> Advanced Options -> Startup Settings.
- Click "Restart" and your computer will restart once more.
- Press the number for "Disable Driver Signature Enforcement".
- You're done.
Please be noted that this is temporary. Once you restart your computer the again, the Driver Signature Enforcement will be enabled. To disable it, obviously you'll have to go through the above steps again.
Download Driver Package + Flash Tool
I've already prepared a .zip archive containing both tools here via Google Drive.
Installing The Spreadtrum Drivers
 |
| Select the appropriate version according to your OS architecture (32 or 64-bit). |
Now that Driver Signature Enforcement is disabled, you should now be able to install the necessary drivers. Here's how you can install the drivers:
- Extract the .zip archive.
- Navigate to the "SCI-android-usb-driver-jungo-v4" folder, then into the folder appropriate for your OS (x86 for 32-bit and x64 for 64-bit).
- Run "DPInst.exe" and follow the instructions.
- Depending on your Windows settings, you might be told that Windows cannot verify the driver's publisher. Proceed by selecting "Install drivers anyway".
 |
| If you don't pick the second option, you won't be able to proceed. |
 |
| Once done, you should get this screen. |
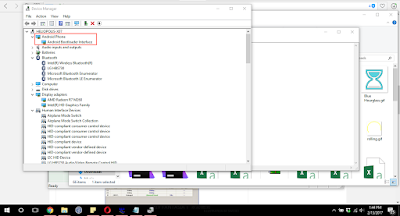
To make sure that the driver is properly installed, you can go to Fastboot mode by turning off the tablet, then hold down Volume Down + Power buttons until the screen says "fastboot mode" and plug the device into your computer. The device should be read as "Android Bootloader Interface".
 |
| If the driver is properly installed, it should be identified as "Android Bootloader Interface". |
Start Flashing
 |
| You'll need UpgradeDownload utility for flashing. |
Now comes the fun part: flashing. Turn off the tablet, then download the latest firmware for your tablet directly from Evercoss here. Extract the archive, and you should have one .pac file. This file is the whole ROM. Here's a step-by-step guide to flash the firmware:
- Run "UpgradeDownload.exe" from the first .zip archive. It's located in a folder named "UPGRADEDOWNLOAD_R2.9.9015".
- Click the single gear button (highlighted in the first picture of this section) and select the .pac file you just downloaded. The tool will process the ROM. Once the processing is finished, the second (double gear) and third (arrow) buttons should be enabled.
 |
| The .zip provided by Evercoss contains only one ROM file. |
- Click the third button (arrow button).
 |
| Once the tool is done loading the ROM, click the third button. |
- The tablet, while still off, hold down the Volume Up as you connect the tablet to your computer. The tool will automatically detect the device and begin flashing immediately.
- Stay calm, have a drink, and let the tool finishes its job.
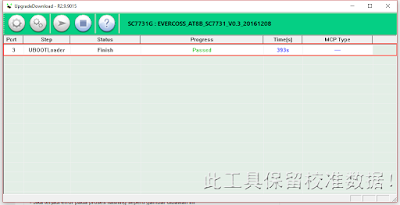
- Once the flashing is complete, disconnect the tablet and reboot. You're done.
 |
| Once the flashing is complete. You'll get the above screen. |
Compatibility with Other Spreadtrum Android Devices
Spreadtrum is one of the more affordable solutions for lower-end, affordable devices. A number of manufacturers actually use their CPU such as Evercoss, Advan, and Micromax. After doing a bit of research, it seems like they all use the same, universal tool for flashing, the UpgradeDownload tool. There's also another tool, ResearchDownload, which seems to provide the same functionality. Yeah, I've tried upgrading and downgrading using UpgradeDownload and there doesn't seem to be any problem...
Although the process is similar, there may be a difference in the booting button. I heard that booting buttons are different across devices. If so, then maybe it's better to google which button on your Spreadtrum device serves as the booting button before flashing. Of course, there is always a risk, and I can't guarantee that it will work 100%.
Well, I guess that's all for now, Folks. I hope that this guide helps you in flashing a new firmware into your Spreadtrum Android devices. As usual, if you have any trouble, feel free to ask me using the comments section below and I'll try my best to answer. Finally, thanks for reading and I'm looking forward to your next visit. Have a nice day! :D

Comments
Post a Comment