Fixing That Yellow Tint in Windows
Again, it's been ages since I updated the post in this blog. The internship got me and that made my holidays more precious than spending time with computers. Fortunately, all of those are now behind me, although there's still paperwork to write. Well, the point is that my timeframe has become more... loose, and I have more time to breathe.
Anyway, enough about me and my end-of-the-year holiday. Today I'm here to talk about a small glitch that has been plaguing the Windows Photo Viewer recently. Yes, if you have that strange yellow tint in the viewer, then you have this glitch. I first noticed this issue when I first used Windows 8 and installed the Office 2013 package. I don't know what's the cause, since people on the forums also reported this issue ever since installing new graphics drivers. Whatever the cause is, I'm here to share a solution on how to solve it.
It turns out that the culprit is the misconfigured color profile of your Windows' Display Settings. If you don't know how to solve it, hit past the break and I'll give you the step-by-step guide on how to solve it.


Anyway, enough about me and my end-of-the-year holiday. Today I'm here to talk about a small glitch that has been plaguing the Windows Photo Viewer recently. Yes, if you have that strange yellow tint in the viewer, then you have this glitch. I first noticed this issue when I first used Windows 8 and installed the Office 2013 package. I don't know what's the cause, since people on the forums also reported this issue ever since installing new graphics drivers. Whatever the cause is, I'm here to share a solution on how to solve it.
 |
| Notice something wrong in this picture? If you're Indonesian, you should :p |
It turns out that the culprit is the misconfigured color profile of your Windows' Display Settings. If you don't know how to solve it, hit past the break and I'll give you the step-by-step guide on how to solve it.
Open Your Display Settings
If you're a Windows 8 or later user, you can do this quite easily. Just right click anywhere on your empty desktop, and click "Screen Resolution". A window about setting your display will appear. Click on "Advanced settings" to bring a small popup window. Click on the "Color Management" tab, and click on the sole "Color Management..." button. The below window will appear.
Choose The Correct Color Profile
If you have this glitch, chances are your color profile is incorrect, even if it's the default profile you've been using before you had the glitch. If you look closer at the picture above, my color profile was the one by BenQ. I've been using that for 3 years and yet, I still had the glitch.
Moving on, please make sure the checkbox is checked should the "Add..." button was disabled. Click that button and choose the one named "sRGB IEC61966-2.1". You can take a look at the snapshot below for a clearer naming.
If you can't find the profile, don't panic just yet. You can download the color profile from here. Navigate to the bottom of the page, and download the color profile. You can download the version 4 if you want, but I only tested the version 2, so try at your own risk.
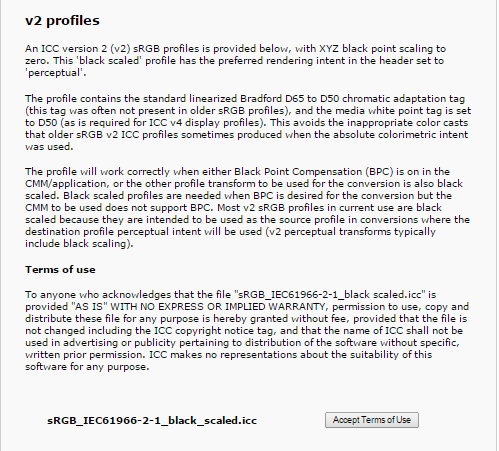 |
| Search for this section in the site and click that button to download |
Once you've downloaded the profile, click browse on the previous window and select the file you've just downloaded. The profile should appear now. Click OK to finalize your change.
Set It as Default
Once the profile appears below your default profile, make sure to make the newly added one the default profile by clicking "Set as Default Profile". To make sure your new settings work, remove your old profile. Don't worry, should you ever want to revert to your old profile, you can add the removed profile back, since it doesn't delete the file, only the name.
 |
| Your new profile should look like this |
Once you're done, click "Close" and close all the previous windows by clicking "OK". Close all instances of Windows Photo Viewer, and try opening an image again. The yellow tint should be gone.
 |
| After changing the profile |
Well, that's how you deal with this little glitch. This solution should work. If it doesn't, sound off in the comments below and I'll try my best to help. Finally, I hope this guide is helpful for you readers and have a nice day to you all. As usual, thanks for visiting and I'm looking forward to your next visit.
Until next time! :D


Comments
Post a Comment